Castle Kellmore rendering
Since Castle Kellmore released on Playdate, I have had a lot of interest in the technical aspects of its rendering system. So I thought I would give a brief insight into how I made it look as good as possible, while (mostly) keeping to 50 frames per second.

Intro
The aim of the game is to wander through a grid-based maze, finding keys to unlock doors, and weapons to help you fight the hordes of creepy monsters that infest the place, ultimately making your way to a portal that will take you to the next level. There are 16 levels of increasing size and complexity, and the last level has a particularly nasty boss.
It’s programmed in C++ and the rendering system is fully integer based, using 16.16 fixed-point maths. This is where the bits of an integer are split up into two parts: the whole number part and the fractional part. I won’t go into detail about fixed-point maths, you can research it yourself, but it is blisteringly fast because computers work well with 32 bit integers. Of course, the Playdate CPU has a very fast support for floating point arithmetic, but since these values will ultimately be used for looking up pixel data in texture arrays, and plotting to the screen, keeping things integer avoids expensive conversions and divides.
Raycasting
Wolfenstein 3D was released in 1992 (on my birthday) to much acclaim. While there had been a few first-person titles before then, people had never really seen anything like it, with its immersive visuals and fast paced free roaming gameplay. It uses a rendering technique call raycasting, which is what I use for Castle Kellmore. While it looks 3D, all calculations are done in the 2D plane. The player roams a grid of empty or solid cells, and in order to render the walls, rays are cast out through the grid from the player’s location until they hit a solid cell. One ray is cast per column of pixels. The distance each ray travels before it hits a wall determines the vertical scaling of the wall for that pixel column.

Rays cast into scene from player’s viewpoint to get depth. One ray per pixel column is cast.
For each ray a vertical span, centred vertically in the window, is drawn. The length of this span is a fixed constant divided by the depth. So the farther away the wall is for that pixel column, the smaller the vertical line drawn. This is how perspective is achieved. It’s a bit difficult to see without textures, so let’s add a bit of fog.
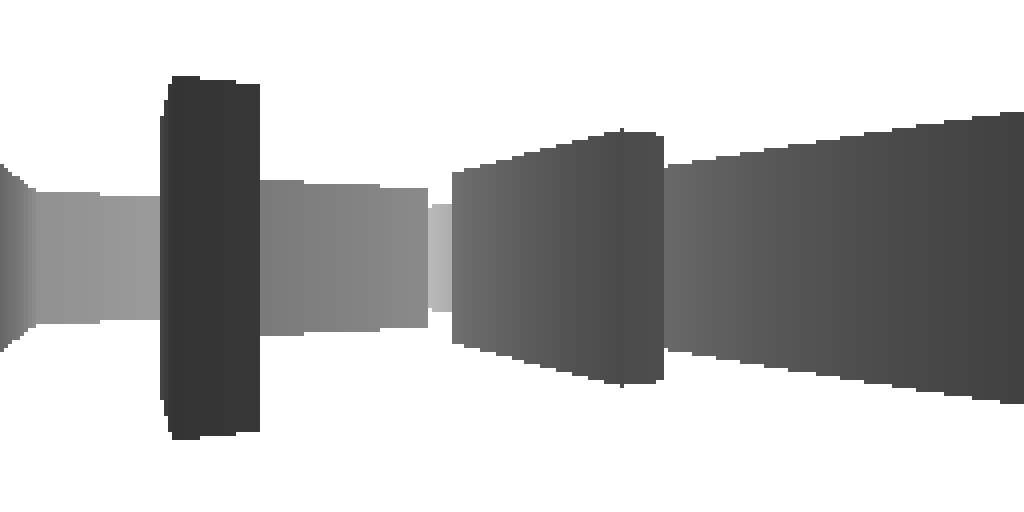
Vertical spans drawn for each ray cast. The length of the span is determined by the distance the ray travels through the grid.
So that is the fundamentals of raycasting. Of course, it’s a bit more complex. Which side of a wall a ray hits and how far along the cell it intersects in each direction is needed to perform texturing, but those are just details. Also, if the camera is close to a wall, the ends of the vertical span may go above and below the edges of the screen so it needs to be clipped to make sure there is no writing outside screen memory.
The Third Dimension
In Castle Kellmore, the player’s head bobs up and down to simulate walking. This is achieved by skewing the vertical columns up and down depending on the head height divided by distance to the wall. It’s a cheap but effective additional touch.
Floor and Ceiling
Wolfenstein 3D did not render floor or ceiling, since that would have been prohibitively expensive for the average PC at the time. But I wanted them to fill out the scene, and make the dungeons feel more claustrophobic. While walls are rendered with vertical spans, floors and ceilings are drawn with horizontal strips. The reason for this is because, from your viewpoint, each point in a vertical strip of a wall is (roughly) the same distance away from you, and a horizontal span of the floor and ceiling also has the same depth. That means no perspective divides are needed along a column of wall pixels or a row of floor/ceiling pixels. The texture offsets between pixels in a span are constant, and therefore the tight inner draw loop can be really fast.
Sprites
The Playdate API does come with a function for drawing scaled sprites. Unfortunately it was not suitable for my game for two main reasons: wall overlap (peeking out from behind walls means only a section of the sprite needs to be drawn, not the whole thing), and amortised rendering, which I will talk about later. This meant that I had to draw the sprites myself, in a similar manner to how walls are drawn.
Drawing them like the walls means drawing them in vertical spans. This created a fundamental limitation, which is this: Every column of a sprite needs to be a contiguous span of pixels.
It would be too much hassle, and much slower, to mix multiple vertical sprite spans and walls spans, so I settled on that constraint. It means the sprites all have to be kind of squat and roundish-squarish, but that is just part of the aesthetics. The minimum and maximum extents of each sprite’s vertical spans are precalculated for fast rendering.

A selection of enemy sprites. Note that each vertical span of opaque pixels is unbroken
Rendering Optimisations
Okay, now we get to the nitty-gritty of the rendering system.
There are three main optimisations:
1) Reduce updatable screen area
2) Render only a fraction of the screen per frame
3) Minimise pixel overdraw
Every pixel takes time to draw. The Playdate screen is a single bitplane, which means for each pixel, only 1 bit is used to determine its colour. That restricts them to two colours, off or on, black or white. Eight horizontal pixels are stored in a single byte. That means, to set a pixel, you have to determine which byte it is in, and then perform boolean logic on that byte to set or unset the appropriate bit within it.
While these operations are incredibly fast, plotting a pixel does take some time, and in order to calculate the colour and write every pixel of the 400x240 pixel screen, it would be too slow for an action game. So optimisations were needed.
Screen Real Estate
The first and easiest optimisation is to simply restrict the renderable area. In the image below, the cyan-tinted area is the playfield. Only pixels in this region are written by the rendering loops. The magenta-tinted areas only get updated when the contents change. The rest of the border is only written to screen memory when the game starts, or returns from the map screen.

The three rendering zones of the screen.
Draw Order
For peak efficiency, we don’t want to be wasting time rendering stuff that will ultimately be obscured by things in front. Graphics cards solve this with a depth buffer, which has a depth for every pixel. When a triangle is drawn, every pixel of it checks the distance stored in the depth buffer. If the new pixel is ‘closer’ to the camera, then it can set the colour and update the depth buffer to the new distance. If not, the pixel is not written. However, on the Playdate, we have neither the memory nor CPU speed for a full screen depth buffer. Luckily, we are not rendering true 3D, we are faking it. So, we can have a linear depth buffer, that is, a depth per pixel column.
Here is the order of operations for rendering a frame:
1) Perform raycasting to fill the depth buffer with wall distances, but do not render anything.
2) Render opaque enemy sprites, front to back, reading from and writing to the depth buffer, storing the min and max vertical extremes for the sprite spans.
3) Render the walls. Each vertical wall span is split into two loops: the upper half and the lower half. Usually, these spans start at the horizon level and work upwards/downwards, but if a sprite has been drawn in that column, the wall spans will start at the min/max extents of the sprite span. So walls behind sprites are occluded by the sprites in front of them without any overdraw. If a sprite is close enough, it’s possible for it to cover the wall entirely, so no pixels will be written for those wall spans.
4) The ceiling is drawn, line by line from top of the screen to horizon level. For each pixel, it checks its y position against the upper extent of the walls and sprites that have been drawn, and skips that pixel if it is lower. To speed this up even more, the upper and lower extents of sprites and walls are put into 8-pixel-aligned ‘buckets.’ This means when rendering the ceiling rows, whole bytes of pixel data can be skipped if the y value is within the extents of the next 8 columns. It’s added complexity, but well worth it. Some levels have an open sky rather than a ceiling. In this case a horizontally seamless sky texture is rendered with the same extents checking as the ceiling.
5) The floor is drawn in a reverse manner.
6) Dying enemies are rendered with a kind of transparency. Depending on how transparent it is, only some pixels are drawn. More about this in the next section. Blood spurt particles are also drawn using distance-scaled black rectangles.
7) Pickups, like weapons and hearts, are rendered back to front, reading the depth buffer to not overwrite closer columns.
8) Finally, the player’s hand and weapon sprite is drawn over the rest of the image. It uses the API’s sprite drawing routine, with scissor enabled so as to not overwrite the border when it bobs up and down.

Rendering draw order. Care was taken to eliminate overdraw as much as possible.
Amortised rendering
The above image is actually a bit misleading. I did it that way to show you the draw order, but that’s not really what’s happening. In truth, there is no black screen. The playfield in only cleared at the beginning of the level. While playing, only a fraction of the pixels are calculated every frame, leaving behind what was there in the last frame. Over several frames, every pixel is eventually calculated, in a checkerboard pattern, leading to a kind of motion blur. Calculating every pixel every frame would make the game crawl to a single digit framerate.
In fact, there are two complete rendering engines working in tandem. For fast visual motion, such as when the player is running or rotating quickly, a chunky rendering routine is used to make the quick motion more coherent. But when the motion slows down, a more fine-grained rendering system is used.
The fine-grained rendering system renders only 1/6th of the screen every frame. It follows this pattern:

The magenta-tinted box shows the 2x3 repeating pattern. On frame 1, all pixels labelled 1 are calculated and drawn. The next frame, pixels labelled 2 are drawn, and so on. After 6 frames, the entire screen has been drawn. Then the loop repeats.
Note: Dying enemies use this amortised system to render semi-transparently. They are only rendered on some of the frames, depending on the level of transparency. It kinda works, but looks a bit weird if the camera is still moving.
However, when motion is high, 6 frames to draw the screen is too slow, resulting in a messy blur. In such a case, a chunky rendering method is used, as seen below:

On frame 1, pixels labelled 1 are calculated and drawn. But also, pixels labeled 1’ take the same value as the pixels to the left of them. This means every third row is drawn per frame. It is still only calculating 1/6th of the image, but it only takes 3 frames to render the whole screen, as everything is drawn using 2x1 ‘chunky’ pixels. At high speeds, motion coherence is preferable to image fidelity.
The following image shows the same scene rendered with the fine and chunky methods:

Conclusion
So that’s it.
There’s a lot more that could be said, such as how the fog/darkness works, how the map works, and so on, but those are just extraneous details. There are also numerous other little hacky optimisations, but that is basically how the game is rendered. I hope I have at least kept your interest during this article, and if you are a programmer, perhaps I’ve even inspired you to try writing your own raycaster.
Castle Kellmore is out now on Catalog; here is a link to the official page. Please let me know if your found this article helpful/entertaining, or if you find any errors.